
Hello,
I’m a Master’s Mechanical Engineer from the University of Colorado Boulder. Creating things is my passion, and changing the world gives me my drive.
⇩
Featured Work
Sierra Space | Debris Net Launcher
As part of a senior capstone with Sierra Space, I helped develop a multi-mechanism debris net launcher designed to identify, capture, damp, and retrieve unresponsive orbital debris. I led the mechanical and systems development of the damping subsystem, integrating sensor-driven controls, solenoid and burn‑wire actuation, and several rotational and linear assemblies. My focus was on resolving mechanical binding and tolerance issues: this involved transitioning from Delrin bushings to RC-fit linear ball bearings, redesigning friction interfaces using Delrin sleeves, and validating performance through CAD tolerance analysis and hands-on prototyping. The final system operated reliably through manual and sensor-assisted actuation, with significantly smoother motion and improved repeatability—positioned for full integration and further qualification testing.

Custom Fender Mirrors
Designed to blend vintage style with modern practicality, these fender mirrors bring classic 1960s–70s aesthetics to the S130 chassis while solving a longstanding gap in the Z-car restoration space. I modeled the mirrors in SolidWorks with a focus on community accessibility: each part fits within standard print beds, minimizes overhangs to avoid support structures, and can be assembled using common hardware and recycled power-regulator components. After several rounds of scale and proportion refinements, shrinking a 5″ prototype to a refined 4″ design, I finalized mounts that flow naturally from the hoodline and retain full adjustability. These mirrors are ideal for the hundreds of builders in the Z-car community seeking a clean, printable fender mirror option that respects both form and function while maintaining safety.
Read about the full project below-
These are set of powered vehicle fender mirrors, designed with inspiration from the sleek, classic aesthetics of the 1960s and 1970s. These decades were known for their distinct automotive styling, where form and function blended seamlessly into striking designs. I want to capture that same essence while integrating modern functionality through powered adjustability.
My vision was to create mirrors that hold the charm of vintage bullet-style fender mirrors, commonly found on classic European and Japanese sports cars. These mirrors, characterized by their rounded, streamlined housings and round glass lenses, contributed to the unmistakable look of cars from that era. Unlike modern side mirrors mounted on doors, fender mirrors provide a unique aesthetic and a different viewing angle, often improving visibility by reducing blind spots.
Rather than simply replicating these retro designs, I incorporated an organic flow in the structure—one where the mirror assembly appears to emerge seamlessly from the vehicle’s hood, forming a continuous, elegant curve into the mirror housing. This integration will give the mirrors a more intentional, sculpted look rather than appearing as a tacked-on accessory for my retromodded 1982 Datsun 280zx.


My design process started by taking side profile images of the vehicle I intended the mirrors to go on. I edited the background from the image and placed the vehicle on a blank white canvas to sketch on. I often find my greatest success when I can design within a greater context of the aesthetic. I created and iterated several profiles that matched my internal vision and consolidated the ideas that I liked most.

While working on modeling a mirror in Solidworks, I encountered a significant challenge: sizing the housing to fit the mirror glass appropriately. Initially, I was hesitant about using a 4" mirror, considering it too small for safety based on my experience with fixed mirrors. The recycled mirrors I found were primarily 4" acrylic, which easily scratches—particularly problematic for removing ice. Thus, I decided to order a 5" mirror and proceeded to model the housing in CAD. To visualize the fit, I edited the model onto an image of my car, using the current mirror for scale. The result seemed slightly large but acceptable. However, when I printed the prototype and tested it on the car, its size was comically large. Laughing at the mismatch, I resigned myself to using the 4-inch mirror, rationalizing that making it power adjustable and positioning it closer to the driver could compensate for its smaller size.

Considering my functional goal, I also could not be happier. I will finally be able to remotely control my fender mirrors from the comfort and convenience of the driver's seat. They are capable of pivoting such that one design will be applicable to both sides of the vehicle, the original mounting solution is maintained such that I will not needlessly drill more holes in my car, and my safety will be preserved with the precise adjustability of the lenses.
Next for the fender mirrors is mounting them to my car and consolidating the electronics I used in development into a clean user interface. I think that there is opportunity for these mirrors to be used by others, there is a large following in this aesthetic, and I really believe that this design will make a big impact.
FSAE Competiton Vehicle Intake
I created a flow visualization rig to explore internal airflow patterns such as vortices and Kelvin‑Helmholtz instabilities within the intake plenum and velocity stacks of the CU Boulder FSAE vehicle. Using CAD-derived acrylic and wood assemblies, I directed smoke (or dry-ice fog) through scaled 2D cross-sections, controlling flow via a vacuum setup to simulate engine pulses. High-speed video capture and contrast-based editing revealed subtle instabilities that were otherwise invisible, providing actionable insights for intake design refinements. The result is a compelling visual dataset and report that informed future intake geometry tweaks, contributing to a 10% broadband power increase.
In “Ebb & Flow” I utilized a smoke machine to create visible particles and emulated the oscillating flow of air through a vehicle's intake system. The model used is an exact cross section of the vehicle on the car.
In “Velocity Stacks” the principals of the visualization are much the same, however it used a generic prototype geometry and dry ice fog to visualize the flow.
In the future I want to recreate the Ebb and Flow experiment but with dry ice fog, as it has better texture and visibility which helps convey the exact phenomenon of the system to the viewer.


Bluetooth iPod
Upcycling Outdated Tech for the Wireless Age
-
![]()
To modernize an outdated iPod, I installed a compact Bluetooth audio module, an upgraded Li-ion battery, and an SSD storage expansion—all through precise, fine-pitch soldering. By carefully integrating the Bluetooth board into the original chassis and routing audio via 1 mm wires, I preserved the device’s aesthetic while enabling wireless streaming. The project sharpened my hardware-integration skills and achieved a seamless user experience—proof-of-concept that retrofits can revitalize legacy electronics without sacrificing form.
-
![]()
Fine connections made to the audio output with 1mm wire
-
![]()
Full Assembly Before sealing with bluetooth module, activation switch and upgraded battery and memory


Projectile Launching Competition Robot
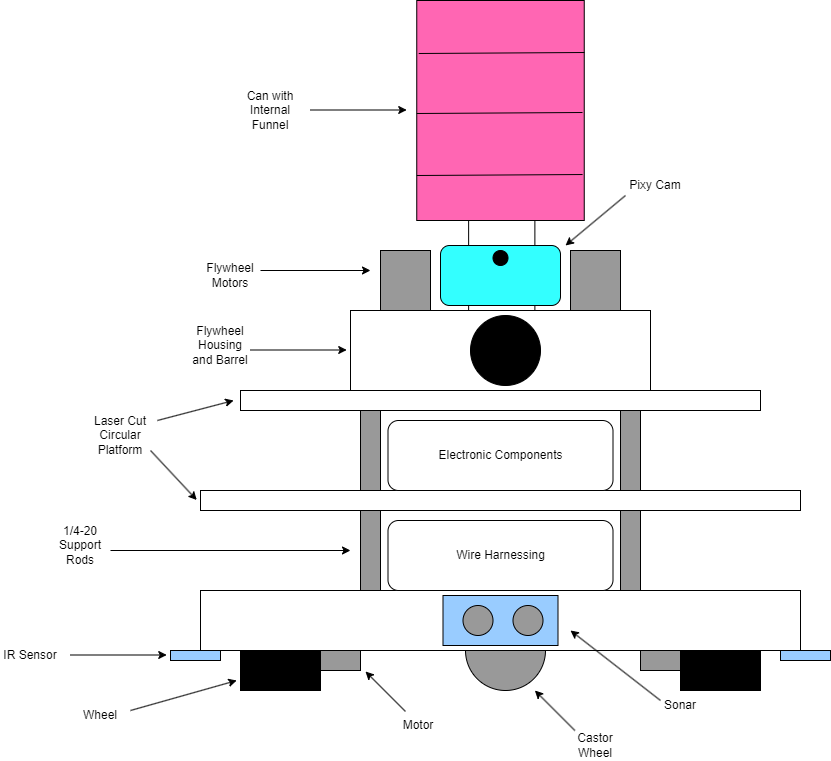
In my Mechatronics & Robotics course at CU Boulder, I co-developed an autonomous “tank” robot that navigates an obstacle-rich arena, identifies opponent bots via computer vision (detecting a pink coffee can), and fires Nerf projectiles to score points. I led the design of the 3D-printed chassis in SolidWorks, the development of motor-driver and sensor daughterboards in Altium, and the integration of motors, IR, sonar, and solenoid systems, all while adapting to a shift from custom PCB fabrication to streamlined wiring for timetable efficiency. The final robot successfully competed in an end-of-semester tournament, demonstrating robust sensor fusion, reliable actuation, and a compact mechanical-electrical integration strategy.
Read about the full project here


Custom Cruiser
Skateboard Deck
I designed and built a hybrid cruiser deck that blends vintage surfboard aesthetics with old-school skate geometry, using a combination of digital and hands-on fabrication. Starting with hard rock maple veneers and a cherry face veneer, I modeled the board in SolidWorks, laser-cut seven layered profiles, and pressed them in a custom foam mold milled via Autodesk Inventor CAM. The result is a functional, visually rich cruiser that reflects thoughtful material selection, curvature control, and craftsmanship—all aligned with the vision of a nostalgic yet practical board.


To shape the board, I designed a three-dimensional mold in Autodesk Inventor with precise rocker, concave, and kick geometry. I bonded 2″ foam panels into a block, and used Inventor CAM to generate toolpaths for a ½″ end mill on a router table. After a test clearance pass to remove high spots, I performed the full cut—yielding a mold that perfectly captured the intended board curvature before veneer pressing.

To laminate the seven veneer layers into a single cohesive deck, I used a vacuum bag press around the foam mold. I applied Titebond III wood glue between each layer, carefully aligning the laser-cut profiles in their original order to preserve the curvature and contouring during pressing. The bag was sealed and connected to a vacuum pump, which held the layers tightly against the mold's rocker and concave for several hours while the adhesive cured. This method ensured even pressure distribution across the complex geometry, resulting in a clean, strong bond with minimal springback and excellent conformity to the designed board shape.
The technical journey began with sourcing seven-ply 1/16″ hard rock maple veneers and a locally obtained thin cherry top veneer to achieve a warm, pastel-ready look. I transitioned to SolidWorks to establish the board’s profile featuring a narrow waist, wide tail, pointed nose, rocker, and concave, then exported the outline as DXF for laser cutting. The seven veneers showed minor warp during cutting, requiring careful alignment, multiple passes, and taping to preserve layer order for pressing.