
Datsun Fairlady 280-ZX
A Dream in the Making
From the video games of childhood comes a project for a lifetime.
The Datsun / Nissan S130 chassis has proven to hold a wealth of potential for refining and building my skillset. View the challenges and solutions derived from bringing a 40-year-old car back onto the road as a daily driver with modern convinces.
Acoustic Resonator Tuning in an Automotive Exhaust System
This project explores the use of Helmholtz and Quarter-wave resonators to selectively attenuate targeted frequencies in a performance vehicle’s exhaust system. The goal was to investigate how subtle changes in geometry affect resonator behavior and to better understand their role in shaping the exhaust sound profile without compromising engine performance. The process involved building and testing several physical configurations on a real vehicle, recording and analyzing audio data at steady engine speeds, and creating a repeatable methodology for frequency-domain evaluation. The results showed that both resonator types effectively attenuate key frequency orders within the exhaust spectrum, though each behaves differently in terms of bandwidth and tuning precision. Constructive interference surrounding attenuation zones was consistently observed, prompting further exploration into phase dynamics and wave behavior.


The test platform was a 1970s L28 inline-six-cylinder gasoline engine operating through a 304 stainless steel, 2.5-inch diameter exhaust system. Exhaust gas traveled approximately 3700 mm from engine to tailpipe, passing through a 300 mm glass-pack muffler and, downstream from the test section, a Flowmaster Super-50. Resonators were installed at a fixed point in the midsection via a slip-fit connection, sealed with aluminum tape to prevent leaks. Both the Helmholtz and Quarter-wave resonators were constructed from stainless steel, with the Helmholtz using a short, adjustable neck (121–172 mm) and the Quarter-wave device ranging in length from 737 to 787 mm. Each resonator was tested in three configurations (long, medium, short), and two control cases were collected: one with an open slip neck, and another with the neck sealed but no resonator installed.
To capture sound data, a DAQ-grade microphone was mounted 500 mm from the exhaust tip and offset 20 mm from the axis. Engine speed was controlled remotely and held steady for eight seconds at each 1000 RPM interval from 1000 to 6000 RPM. Audio was saved as .wav files and processed using Fast Fourier Transform (FFT) in Audacity. These results were exported as .txt files and plotted using a custom Python script. Each configuration generated six plots, with a master script used to compile 3D surfaces and delta plots against the control data. The file structure included individual plotting scripts for each configuration and a top-level controller to automate full comparisons.

The final plots revealed distinct attenuation bands for each resonator. Helmholtz configurations produced wider notches, often with sharp amplification just outside the targeted range—likely due to phase lag drifting past 180 degrees, causing constructive wave interference. Quarter-wave configurations produced narrower attenuation zones, more tightly focused around target frequencies. As neck lengths were shortened, the range of attenuated frequencies consistently narrowed, but the center frequencies remained relatively fixed, indicating that only small tuning shifts were achievable within the tested range. The updated microphone eliminated prior artifacts seen with phone-based recordings, confirming that apparent “loudening” and frequency drift in earlier tests were due to onboard processing. With this refined dataset, frequency orders around 70 Hz, 90 Hz, and 150 Hz appeared most consistently across both control and test runs.
Custom Fender Mirrors
Designed to blend vintage style with modern practicality, these fender mirrors bring classic 1960s–70s aesthetics to the S130 chassis while solving a longstanding gap in the Z-car restoration space. I modeled the mirrors in SolidWorks with a focus on community accessibility: each part fits within standard print beds, minimizes overhangs to avoid support structures, and can be assembled using common hardware and recycled power-regulator components. After several rounds of scale and proportion refinements, shrinking a 5″ prototype to a refined 4″ design, I finalized mounts that flow naturally from the hoodline and retain full adjustability. These mirrors are ideal for the hundreds of builders in the Z-car community seeking a clean, printable fender mirror option that respects both form and function while maintaining safety.
Read about the full project below-
These are set of powered vehicle fender mirrors, designed with inspiration from the sleek, classic aesthetics of the 1960s and 1970s. These decades were known for their distinct automotive styling, where form and function blended seamlessly into striking designs. I want to capture that same essence while integrating modern functionality through powered adjustability.
My vision was to create mirrors that hold the charm of vintage bullet-style fender mirrors, commonly found on classic European and Japanese sports cars. These mirrors, characterized by their rounded, streamlined housings and round glass lenses, contributed to the unmistakable look of cars from that era. Unlike modern side mirrors mounted on doors, fender mirrors provide a unique aesthetic and a different viewing angle, often improving visibility by reducing blind spots.
Rather than simply replicating these retro designs, I incorporated an organic flow in the structure—one where the mirror assembly appears to emerge seamlessly from the vehicle’s hood, forming a continuous, elegant curve into the mirror housing. This integration will give the mirrors a more intentional, sculpted look rather than appearing as a tacked-on accessory for my retromodded 1982 Datsun 280zx.


My design process started by taking side profile images of the vehicle I intended the mirrors to go on. I edited the background from the image and placed the vehicle on a blank white canvas to sketch on. I often find my greatest success when I can design within a greater context of the aesthetic. I created and iterated several profiles that matched my internal vision and consolidated the ideas that I liked most.

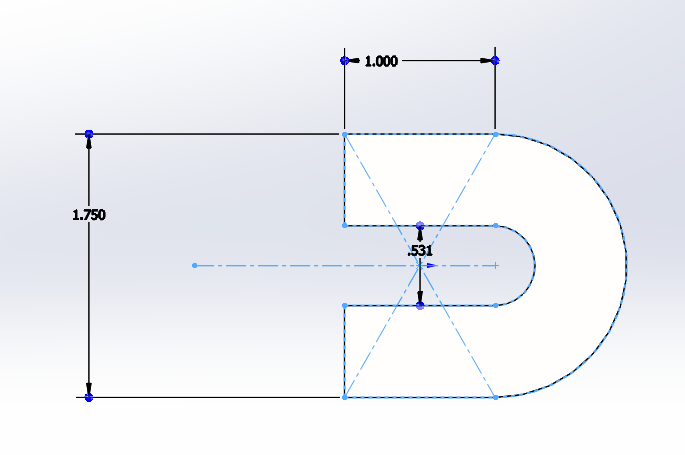
While working on modeling a mirror in Solidworks, I encountered a significant challenge: sizing the housing to fit the mirror glass appropriately. Initially, I was hesitant about using a 4" mirror, considering it too small for safety based on my experience with fixed mirrors. The recycled mirrors I found were primarily 4" acrylic, which easily scratches—particularly problematic for removing ice. Thus, I decided to order a 5" mirror and proceeded to model the housing in CAD. To visualize the fit, I edited the model onto an image of my car, using the current mirror for scale. The result seemed slightly large but acceptable. However, when I printed the prototype and tested it on the car, its size was comically large. Laughing at the mismatch, I resigned myself to using the 4-inch mirror, rationalizing that making it power adjustable and positioning it closer to the driver could compensate for its smaller size.

Considering my functional goal, I also could not be happier. I will finally be able to remotely control my fender mirrors from the comfort and convenience of the driver's seat. They are capable of pivoting such that one design will be applicable to both sides of the vehicle, the original mounting solution is maintained such that I will not needlessly drill more holes in my car, and my safety will be preserved with the precise adjustability of the lenses.
Next for the fender mirrors is mounting them to my car and consolidating the electronics I used in development into a clean user interface. I think that there is opportunity for these mirrors to be used by others, there is a large following in this aesthetic, and I really believe that this design will make a big impact.
Anti-Theft Immobilization Circuit
The factory ignition system on the Datsun 280ZX offers almost no resistance to hot-wiring, especially when the ignition cylinder is worn. To solve this elegantly, I designed a hidden anti-theft circuit that disables the fuel pump unless a concealed switch is toggled at startup.
The circuit uses a self-latching automotive relay and logic-level output from a compact PCB I designed and assembled in Altium. It’s built around a fail-safe “no-voltage return” system: the moment power is cut—whether due to tampering or shutdown—the fuel pump is disabled and can’t be reactivated without the correct rearming sequence. The installation is clean, reversible, and completely hidden, requiring no visible switches or manual steps once the car is started. Unlike cheap mechanical cutoffs, this design integrates invisibly into the existing harness and operates with near-zero current draw when idle. It provides meaningful security for classic cars in a way that’s subtle, modern, and designed from first principles rather than off-the-shelf hacks.
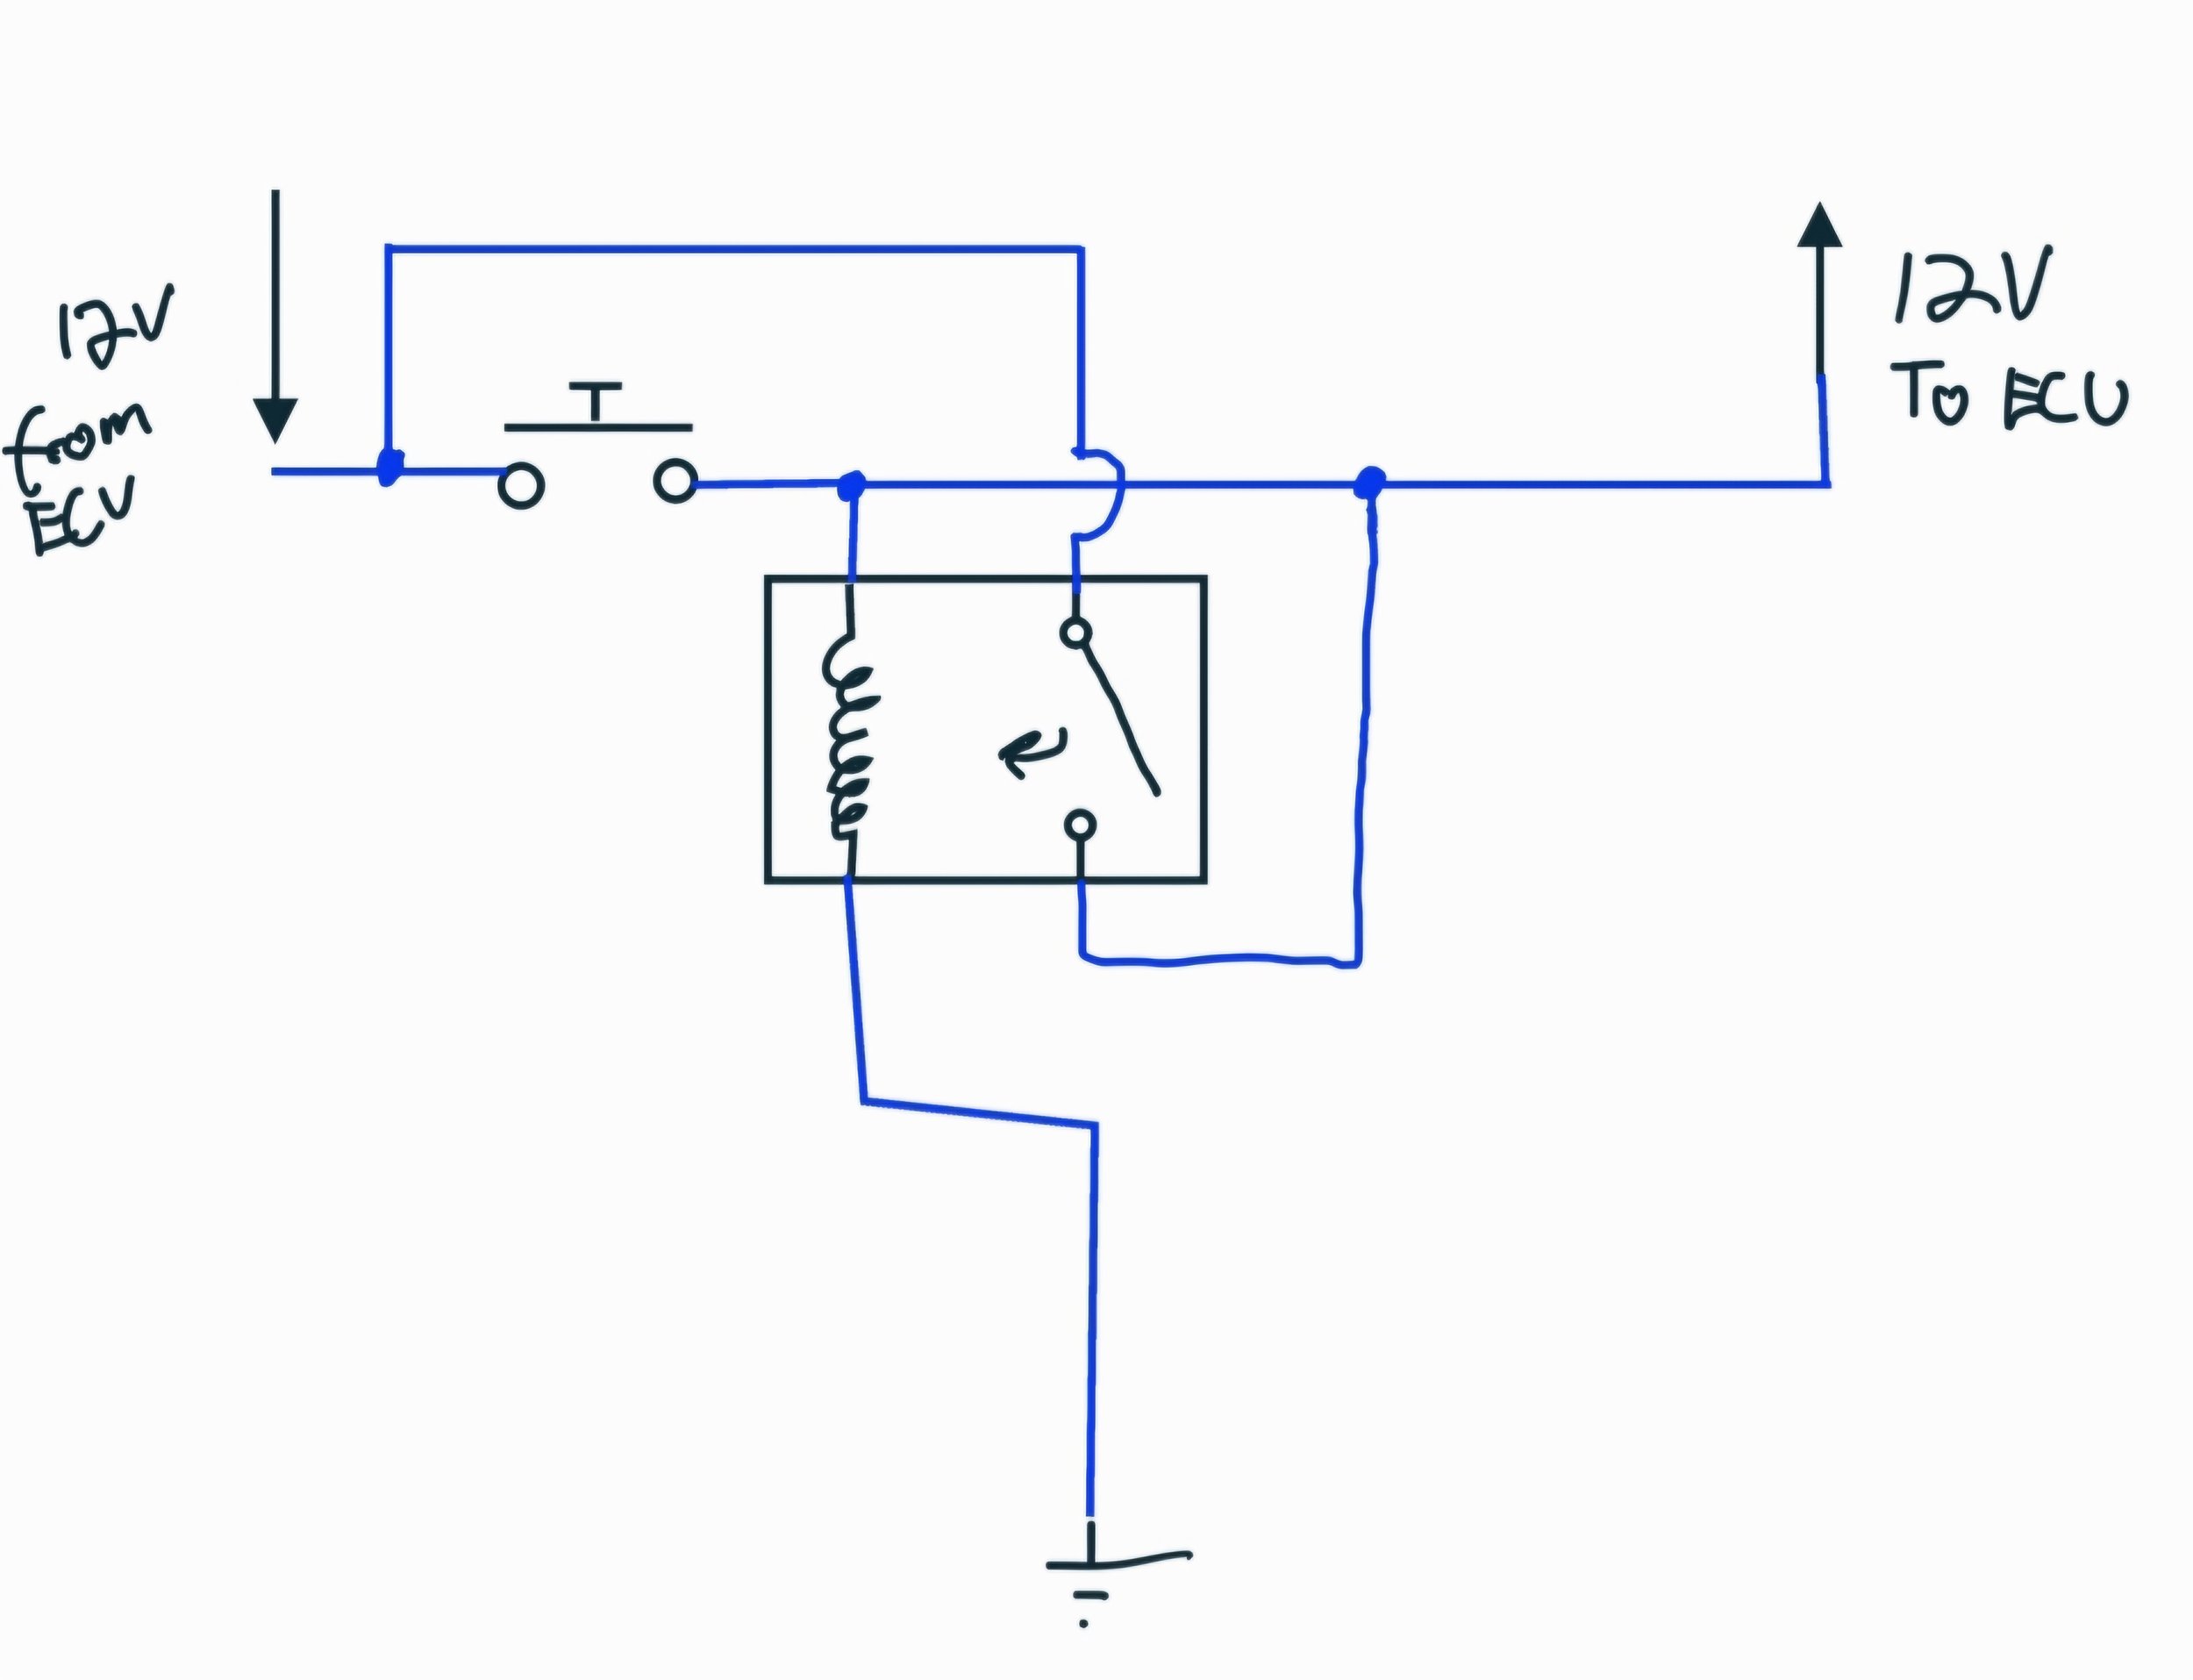
A Hand Drawn Diagram of the Circuit

Breadboarded Example of the Circuit Proving the Concept

The full Circuit Laid out in Altium
Custom Footprint Made for the Automotive Relay I Own

Full PCB Created In Altium
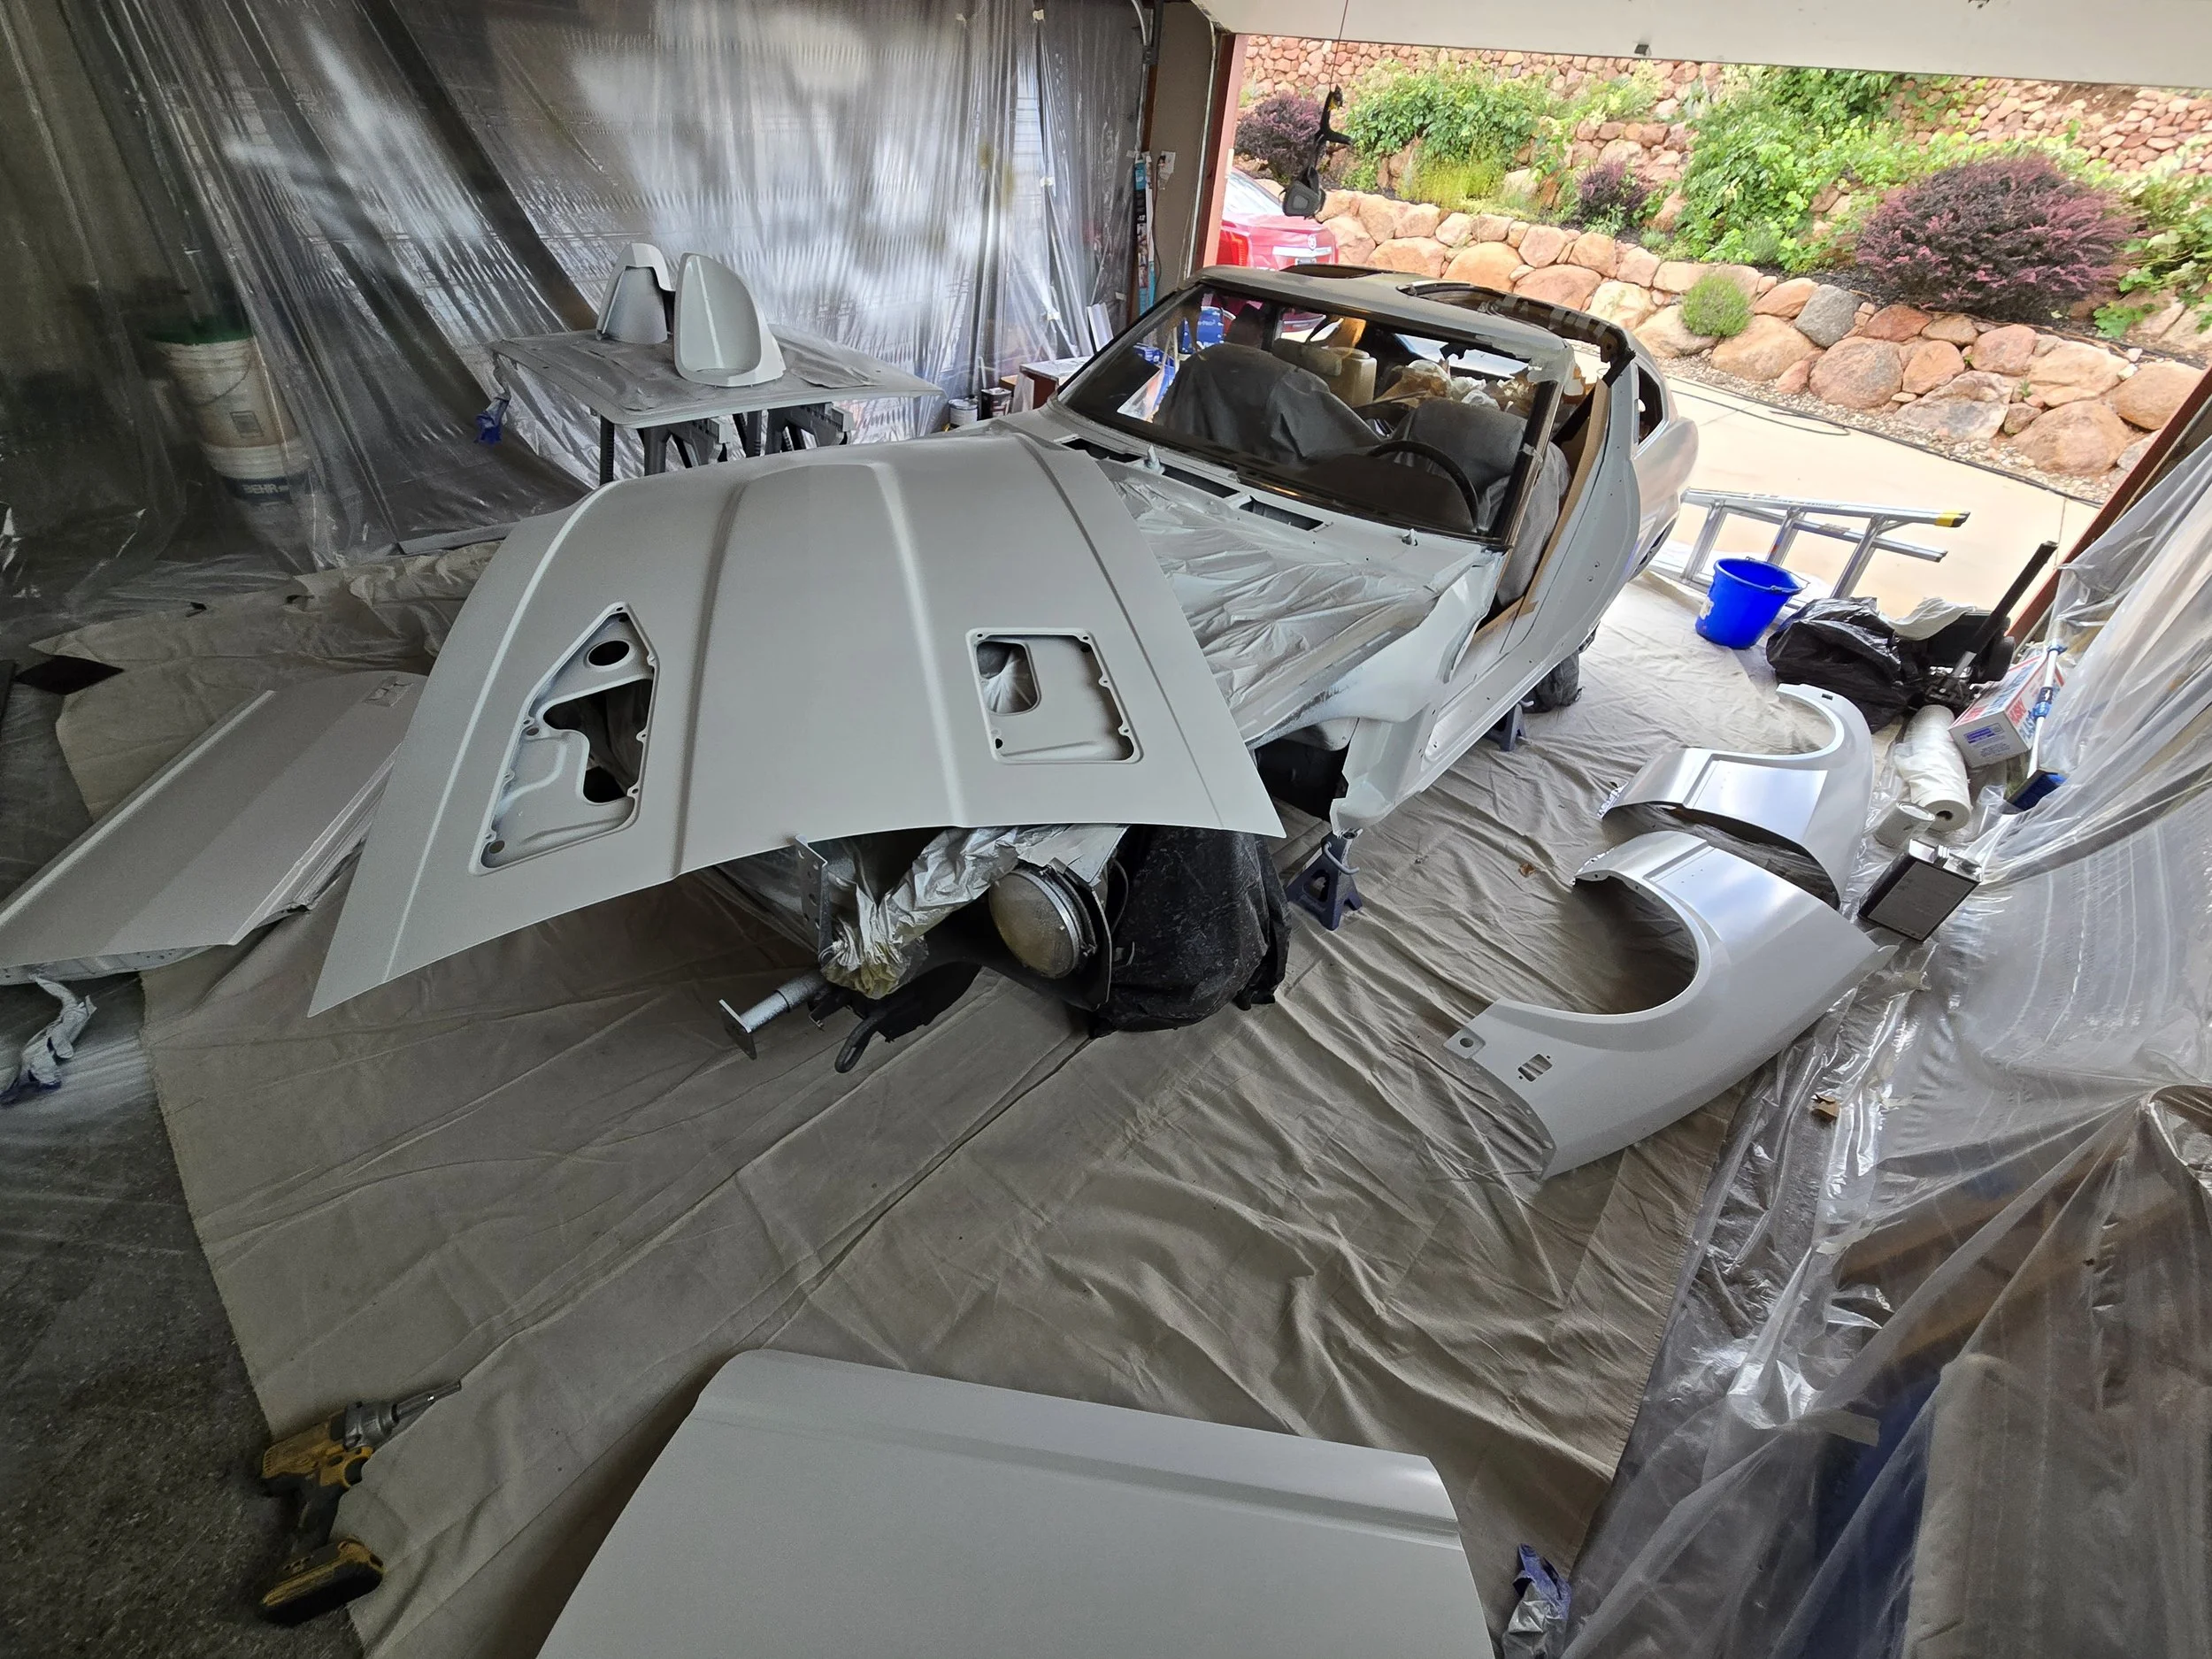
Full Vehicle Respray
After discovering severe sun damage and rust on the original paint, I embarked on a full respray in a candy-red finish over a black base emulating Mazda’s premium finish with a cost-effective “candy paint” technique. Preparations included complete panel stripping to bare metal, hole welding (for mirror and antenna delete), self-etching and high-build primers, multiple sanding cycles, and expert father-son painting collaboration. The result: a deep, glossy finish achieved through over four weeks of prep and paint, delivering both restoration quality and emotional growth through perseverance.
Throughout this project, I gained invaluable insights, but the most profound lessons were about patience and the importance of thorough preparation. The extensive and meticulous sanding sessions, often stretching into the early hours, not only shaped the car but also offered me a unique opportunity for introspection.
During those countless nights, as I labored over every inch of the vehicle's surface, I came to appreciate the profound connection between meticulous attention to detail and achieving excellence. This process wasn't just about transforming a car; it was a transformative journey for me as well. I developed a deeper mental resilience and a more spiritual outlook on both my craft and life itself.
I emerged from this experience with a reinforced belief in the value of perseverance and the importance of a well-considered approach. These lessons have reshaped my approach to challenges, encouraging a more thoughtful and patient demeanor. This project was not only a labor of love but a pivotal chapter in my personal growth.
Paint Removal
-
![]()
Sealing the Solvent
To keep the solvent active, we retained moisture by wrapping the entire vehicle in plastic masking after applying thick layers of gel paint dissolver to every square inch of the vehicle
-
![]()
Slow Progress
Modern paint strippers are engineered to be more environmentally and user friendly at the expense of being less expensive. Over the course of the stripping process, we applied stripper across the entire vehicle four times
-
![]()
Paint Bubbles
We had experimented with several different paint strippers until we found a product capable of fully lifting the paint from the metal, whereas other products would only soften the paint enough to be mechanically removed by a scraper
-
![]()
Hidden Damage
Much to my surprise, I found a rather large section of the car with deep dents covered in Bondo. It looked as though someone had thrown a billiards ball at this corner a dozen times. I’m still not sure what could have happened here?
-
![]()
My new DeLorean
After two weeks of applying solvent and sanding, we had the vehicle down to bare metal and were ready to move on to the next step!


The Details
-
![]()
Blowing it Apart
The next step was to completely disassemble everything, remove all of the remaining paint that was hidden away in the last step, and begin meticulously sanding and degreasing the metal to get it ready for paint
-
![]()
Self-Etching Primer
To ensure a positive bond between the paint and the metal, a self-etching primer was applied to chemically affix itself to the metal and provide a strong foundation for later layers. These primer layers also served for great practice with unfamiliar equipment and identifying odd angles.
-
![]()
High Build Primer
The entire car was coated with four layers of high build primer. These thick layers allowed me to use long and wide block sanders to identify low and high spots in the paint, creating perfectly smooth panels.
-
![]()
Two Steps Back
The sanding process was remarkable tedious, as every stroke of the sanding block was paramount to the project’s success and could not be rushed. This process was also remarkable in the mess that it had made. My fabricated paint booth had to be completely replaced, and the entire car needed to be degreased again before painting.
-
![]()
First Color
In a single day, all of the jambs, wheel arches, and undersides of panels were finally painted. It was the first time we had gotten to see the color, and the excitement that filled my body gave me the motivation I needed to see this project through.


The Culmination
-
![]()
Return to Form?
The first step of the final push was to recoat the entire exterior in a thinned-out primer: a glaze coat.
-
![]()
Paint It, Black
I think I could have been happy at this stage. The car was well restored, and back to its original color. Sleek and elegant, it was almost hard not calling it a day here.
-
![]()
How did we get here?
As I was mixing the first cup of candy paint, anxiety washed over me. The tension in the air was so thick you could cut it. The last several weeks of effort all hinged on the very next moments. There are so many variables at play when spraying candy that it is hard to predict the outcome.
-
![]()
Resolve
Four coats of candy paint fell onto the car in perfection, two layers of clear coat marked the end of the project. The vibrance of the paint was genuinely captivating. It felt unreal that the car in front of me was mine. The joy of completing such a big project was euphoric, and the fact that I got to do it all with my dad cements these weeks as a core memory that I will cherish forever.
-
![]()
Together Again
To this day there are still many things that I would like to improve in the paint work, but I am forever grateful for the journey that brought me here.


When I first purchased my vehicle, I harbored a dream of owning a deep cherry red sports car. However, it quickly became apparent that the existing paint was severely sun-damaged, with rust spots beginning to emerge. Recognizing the need to act swiftly, I decided to undertake a respray to preserve the car's condition for the future.
Inspiration struck when I encountered the stunning Mazda Soul Red Crystal paint. Despite its appeal, the cost of the authentic paint was prohibitive. Instead, I opted for a candy paint solution, which involves applying a base color topped with a semi-transparent, tinted paint to achieve rich depth and luster. I chose a black base beneath a bright red candy coat to emulate the iconic Mazda color.
The preparation process was extensive. We began by removing all trim components and glass, except for the windshield and rear glass. The car was stripped to bare metal using a combination of abrasives and chemical solvents. I found that the solvents were unable to penetrate through the factory clear coat, so abrasives were used to remove as much of the top layer as possible. I also welded shut the holes for the door mirrors and antenna as I chose not to run an FM radio and preferred the aesthetics of fender mirrors. I uncovered and later addressed body damage with body filler.
A self-etching primer was applied first, followed by several layers of high-build primer. These layers were meticulously sanded down to ensure the panels were perfectly smooth. After three weeks of diligent preparation, which included several days devoted to masking off the engine bay and interior, the car was ready for painting. The painting process started with the door jambs, undersides of the fenders, doors, hood, and hatch. Once these parts were painted and had cured, we reassembled the car.
The exterior painting then commenced with two layers of black, followed by four layers of candy paint, and concluded with two layers of clear coat. Throughout this process, I was fortunate to have the guidance of my father, who owns a painting company and has extensive experience with spray painting machinery. His expertise was invaluable, ensuring a finish that far exceeded my expectations.
Full Ignition Rebuild
After noticing intermittent power loss and extreme exhaust temperatures that glowed the manifold cherry red, I conducted a deep dive into the ignition system of my 280ZX. Using systematic diagnostics with a multimeter, I uncovered a cascade of issues—ranging from a malfunctioning vacuum and mechanical advance to fouled plugs and faulty leads—ultimately tracing the root cause to a worn distributor and jumped timing shaft. The resolution involved pulling the oil pump, restacking the distributor drive, and designing a full modern replacement for a long-obsolete ignition system.


This was one of the most intricate diagnostic challenges I’ve tackled. The symptoms pointed to retarded ignition timing, but uncovering the why required persistence and methodical testing. With a multimeter and service manual, I evaluated every part of the system—verifying that both the vacuum advance and centrifugal weights were non-functional, leaving the engine locked into late ignition under all loads. I replaced fouled plugs, confirmed spark output, and identified degraded spark plug wires before discovering that the timing shaft had jumped teeth—a problem I resolved by pulling the oil pump and correcting alignment. Along the way, I researched and reverse-engineered early Nissan ignition systems, from Matchbox-style modules to HEI-compatible replacements. The final step was designing a clean, modern retrofit for the entire distributor—something serviceable, reliable, and forward-compatible, addressing a critical failure point in an aging but beloved engine platform.
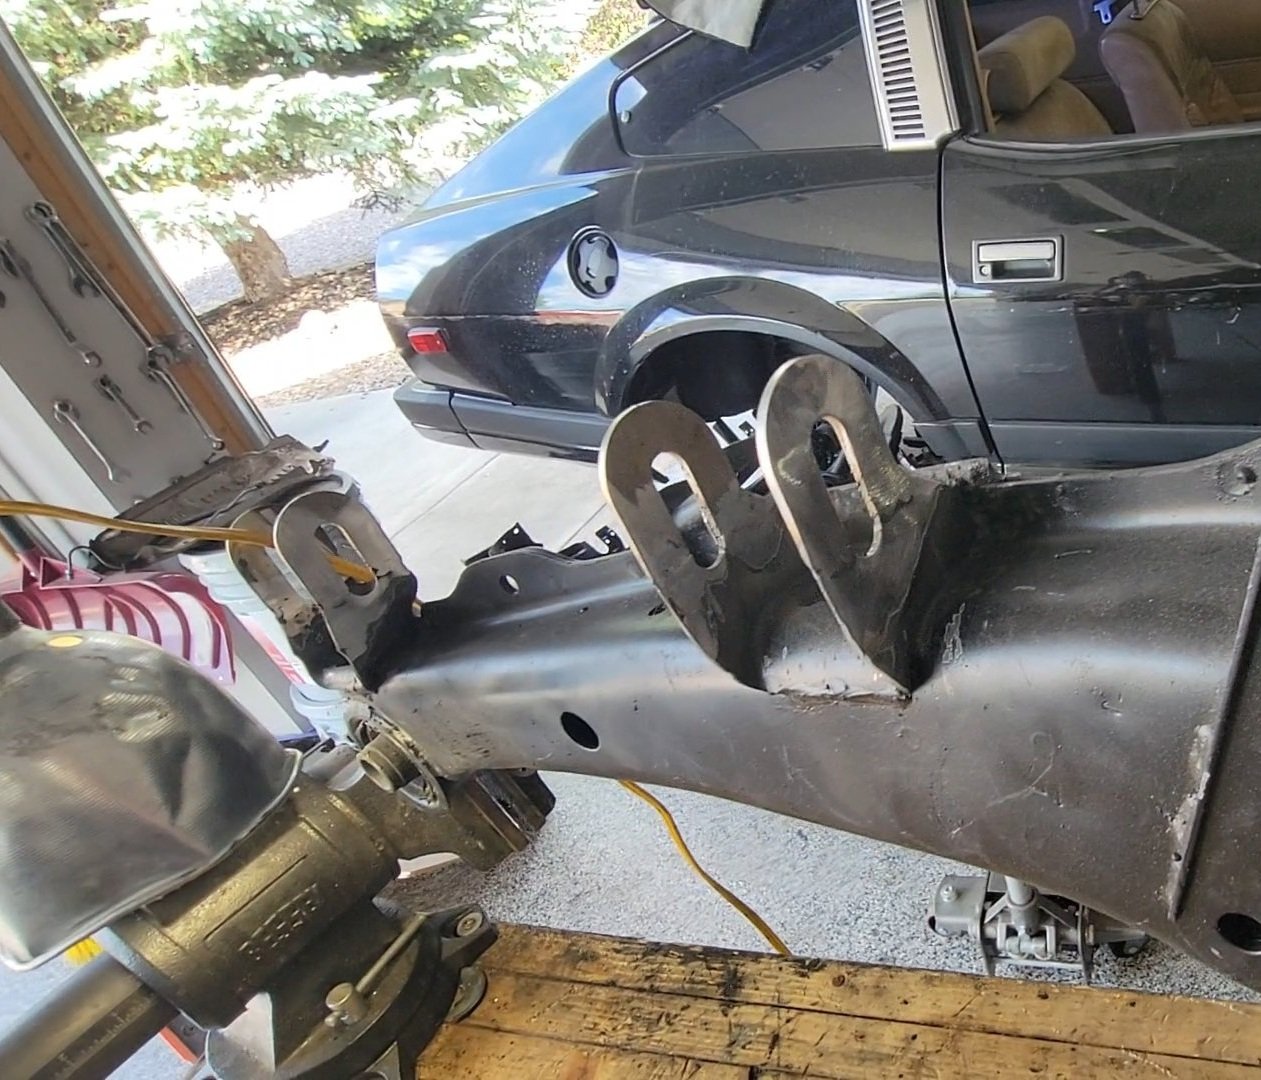
Rear Suspension Adjustment
To resolve alignment issues and modernize the aging rear suspension of my Datsun 280ZX, I designed and welded in a custom toe adjustment system while upgrading every major wear component. The goal was to correct geometry problems caused by subframe distortion, improve ride quality and response, and introduce tunability that the factory suspension lacked. The result is a more precise, serviceable, and high-performance rear end that transforms the way the car handles—without sacrificing reliability or home-servicability.
The biggest challenge was the lack of factory toe adjustment on the S130’s semi-trailing arm rear suspension. My particular chassis had noticeable static toe-in due to an old rear-end collision, which meant rapid tire wear and unpredictable handling under load. I engineered a clean, weld-in solution: laser-cut slotted brackets paired with custom eccentric washers. These allow for toe correction using standard shop tools and provide over ±0.5° of adjustment range per side. Once welded to the subframe, the system restored full control over alignment and is now easily tunable for both street and track setups.
At the same time, I rebuilt the entire rear suspension system. Every bushing was replaced with polyurethane for improved stiffness and longevity. The springs were upgraded to higher-rate units tuned for sportier handling, and the factory differential mount was swapped for a billet aluminum unit to reduce drivetrain slop and unwanted movement under throttle. The net effect is a suspension system that’s tighter, more responsive, and easier to tune—an OEM-plus upgrade that dramatically improves the feel of the car without introducing harshness.

Transmission Rebuild

As part of a comprehensive drivetrain refresh, I rebuilt the FS5W71B five-speed transmission from my 1982 Datsun 280ZX to resolve long-standing issues with gear engagement and drivetrain oil leaks. The project involved a complete disassembly and inspection of internal components, diagnosis of worn synchros and bearings, and replacement of critical gaskets and seals. Working from the factory service manual and supplementing with field-tested advice, I restored the transmission to OEM spec and improved drivetrain performance and reliability. The rebuilt unit was paired with a new clutch and pilot bearing, culminating in smoother gear transitions, reduced drivetrain lash, and the elimination of prior fluid leaks.
The rebuild centered on the FS5W71B gearbox, requiring careful extraction of the transmission assembly, teardown of the front and rear cases, and removal of the countershaft, mainshaft, and shift forks. Using a combination of factory tools and improvised methods—including a bearing puller, feeler gauges, snap ring pliers, and a magnetic pickup—I documented wear patterns on synchro rings and inspected tolerance on bearing clearances and gear faces. After diagnosing oil contamination on the clutch friction surface and identifying excessive shaft play, I resealed the oil pump, installed a new rear main seal, and restacked the mainshaft cluster with OEM replacement parts. Timing and ignition issues were addressed in parallel, including correction of an improperly indexed distributor shaft. The finished system starts cleanly, holds timing, and performs confidently under load.
